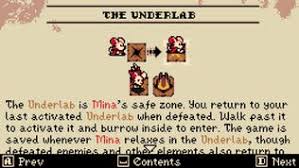
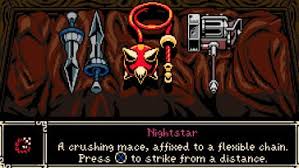
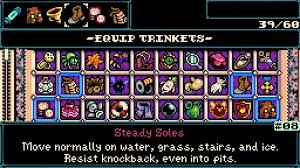
Underlab safe zone · Weapon selection · Trinket equip screen
This Mina the Hollower guide covers everything you need for your first hours — which weapon to pick, where to go first, how Bones and Hollowing work, and the best early trinkets.
Underlab safe zone · Weapon selection · Trinket equip screen
The flail keeps you at a safe distance while dealing consistent damage. Whisper & Vesper is faster but requires committing to close range. Blaststrike Maul hits harder but the charge leaves you exposed. Nightstar is the most forgiving choice for learning the game.
The recommended first area. The boss rewards Proto Spark — the single best early safety trinket. It saves Mina from death once, then resets. This makes your entire first playthrough more forgiving.
Bones are lost on death. Do not carry a large stack into a boss fight you have not beaten before. Spend them at shops or on upgrades — the currency is only valuable if you use it. Also remember: the game only saves when you pass over a burrowing hole — quitting to the menu does not save.
Burrowing underground dodges most enemy attacks. But late Hollowing is worse than not Hollowing at all — you can still take damage if you react too slowly. Learn the timing before you need it in a boss fight.
You can equip up to 6 trinkets (slots unlock as you progress). If you die three times to the same thing, change a trinket before the next attempt. The Trinket Bazaar in Ossex lets you swap for free.
| System | What It Does | Beginner Mistake | Fix |
|---|---|---|---|
| Hollowing (Burrow) | Dodge underground to avoid attacks and reposition | Reacting too late — you still take the hit | Practice in safe rooms; learn the wind-up of each attack, not the hit itself |
| Bones | Main currency — lost on death | Hoarding a large stack before unknown areas | Spend at Legovich's Arms or Trinket Bazaar before risky attempts |
| Trinkets | Passive build tools — equip up to 6 | Never swapping after repeated deaths | If you die 3+ times to the same thing, change one trinket |
| Sidearms | Secondary weapons powered by Joules — lost on death | Saving them for "the right moment" | Use sidearms freely; Joule Jars refill them in the field |
| Vials | Healing items | Using them in the middle of enemy combos | Heal at maximum distance — Vial use is cancelled by damage |
| Spark Containers | Health reserve — lose one per death | Ignoring them | Prioritise Proto Spark (Queensbury) and Spark Catcher (Septemburg) early |
The world is largely non-linear after the first two regions, but this order gives the smoothest difficulty curve and the best early upgrades.
| Order | Area | Why Go Here | Key Reward |
|---|---|---|---|
| 1st | Queensbury Crypt | Easiest region, best early boss reward | Proto Spark trinket (death save) |
| 2nd | Nox's Bayou | Manageable difficulty, introduces water traversal | Nox's Bayou Generator |
| 3rd | Septemburg or Bone Beach | Both are mid-difficulty; Septemburg has more trinkets | Spark Catcher trinket (extra Spark Container) |
| 4th | Bone Beach or Septemburg | Whichever you skipped | Smorgasboar boss reward |
| 5th | Coltrane Peak | Ice mechanics, harder combat | Frozen Horror boss, Thermal Pack trinket |
| 6th | Astral Orrery | Final main region — hardest | Final Spark Generator |
| Trinket | Where to Get | Why It Matters Early |
|---|---|---|
| Proto Spark | Beat Queensbury Crypt boss | Saves from death once per attempt — most forgiving early tool |
| Vascular Syrup | Trinket Bazaar, Ossex | Slow health regen reduces need to use Vials constantly |
| Iron Lung | Coltrane Peak chest | More max health — direct survivability increase |
| Steady Soles | Trinket Bazaar, Ossex | Reduces knockback — keeps you from being pushed into hazards |
| Pit Preserver | Trinket Bazaar, Ossex | Survive one pit fall per room — saves lives in platforming sections |
| Spark Catcher | Septemburg chest | Extra Spark Container — more buffer before death |
Hollowing (burrowing underground) is Mina's core defensive tool. It dodges most enemy attacks, lets you pass through certain hazards, and repositions you without taking chip damage. But it requires practice — here is what to focus on.
| Situation | Use Hollowing | Do Not Use Hollowing |
|---|---|---|
| Enemy starting an attack animation | ✅ Burrow to dodge the hit | ❌ Waiting until the hit lands — too late |
| Boss tornado or wide-area attack | ✅ Burrow to pass through | ❌ Jumping — some attacks hit aerial Mina |
| Crossing a gap with water below | ✅ Burrow at the ledge edge if the path continues underground | ❌ Burrowing into water — exits underwater |
| Repositioning during a boss phase change | ✅ Burrow to a safer spot | ❌ Attacking during the transition — the first new phase attack is often a surprise |
| Low health in a dangerous room | ✅ Burrow to exit combat range and heal | ❌ Staying in melee hoping for a lucky opening |
Continue the guides
Bones are your main currency. You carry them until you die — then you lose them. This makes resource management one of the most impactful beginner decisions.
If you have not beaten a boss before, spend your Bones first. Use them at Legovich's Arms for weapon upgrades, the Trinket Bazaar for trinkets, or the shop in Ossex. Dead Bones are zero Bones.
Buy the Isle Map early. It shows every area and reveals which generators are restored. Worth more than hoarding for later.
Stolenoid (Trinket Bazaar, Ossex) steals one Bone from every enemy defeated. Equip it during exploration runs to passively build resources.
If you die to the same thing three times in a row, follow this checklist before your next attempt.
Full boss roster, preparation tips, loadout recommendations, and difficulty ratings for every encounter.
Complete trinket list with effects, locations, and build synergies for every stage of the game.
All 5 Mina the Hollower weapons ranked and compared — upgrades, tier ranking, and upgrade priority order.
All 15 sidearms, the Joule system, and the best setups for each boss and exploration situation.
Pick Nightstar as your starting weapon, then head to Queensbury Crypt first. Beat the boss to earn Proto Spark — the best early safety trinket. It saves you from death once and resets on death.
Nightstar. Its flail reach lets you deal damage at a safe distance, making it the most forgiving weapon for learning enemy patterns and boss timings.
Bones are the main currency. You lose them on death. Spend them before attempting dangerous areas or bosses — do not carry a large stack into unknown territory.
Press the burrow button to dig underground. Hollowing dodges most attacks, lets you pass through certain hazards, and repositions you safely. Practice the timing in normal rooms before boss fights.
You start with 2 trinket slots and unlock more as you progress, up to a maximum of 6. Swap trinkets at Underlab checkpoints or the Trinket Bazaar in Ossex — no penalty.